Blog
How to Make a DIY Voice Recorder? Try ISD1820!
How to use it?
First, let’s get a simple understanding of the ISD1820 module. The easiest way is to connect it to a DC power supply (3–5V) and use button control directly—then you’ll have a voice recorder! It supports loop, single, and point playback, even a complete novice can use it. Of course, you can also connect it to a microcontroller (like an Arduino board) to add more functions.
- Easy-to-use 10-second voice recording and playback.
- High-quality, natural voice reproduction.
- Can function as a megaphone module.
- Supports loop playback, point playback, and single playback.
- Controllable via a microcontroller.
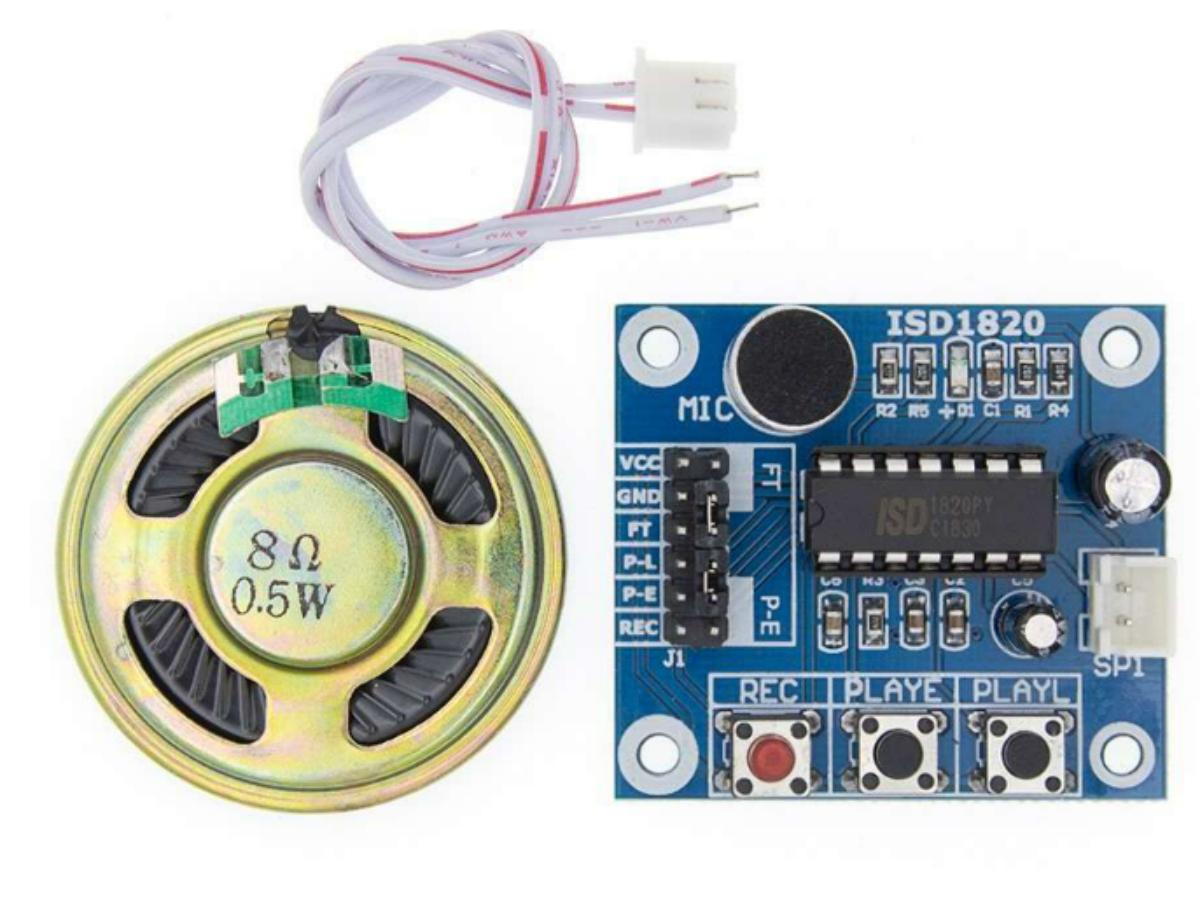
- Can directly drive an 8Ω 0.5W small speaker. (Included with the package).
- Control Methods: Button control or microcontroller (control line IO is already exposed).
- REC Button: Recording button. Press and hold to record; release to stop.
- PLAYE Button: Trigger-mode playback. Press once to play the entire recorded segment.
- PLAYL Button: Point-mode playback. Press and hold to play; release to stop.
- RPL Jumper: Loop playback control (enables continuous loop playback).

Can you use it with microcontroller?
You must have got the hang of controlling this recorder via the buttons by now. Next, let’s try experimenting with this small module using an Arduino board—of course, it’s totally fine if you want to use other development boards instead.
First, let’s test the first function: record for 10 seconds and then play back for 10 seconds.
					int Rec = 3; // Define the recording pin as D3
int Play = 4; // Define the playback pin as D4

void setup() {
  pinMode(Rec, OUTPUT); // Set as output pin
  pinMode(Play, OUTPUT);
}

void loop() {
  digitalWrite(Rec, HIGH); // Set recording pin to HIGH (start recording), delay for 10 seconds
  delay(10000);
  digitalWrite(Rec, LOW); // Set recording pin to LOW (stop recording)
  delay(50); // Short delay for stability

  digitalWrite(Play, HIGH); // Set playback pin to HIGH (play back the recording), delay for 10 seconds
  delay(10000);
  digitalWrite(Play, LOW); // Set playback pin to LOW (stop playback)
  delay(50); // Short delay for stability
}
If everything works properly, we can add some modules to make it more practical—such as an infrared photoelectric obstacle avoidance module, HC-SR04 ultrasonic ranging module, and more. Here we provide a program for a human infrared intrusion voice alarm for your learning and reference. Similar to the previous one, it works by connecting the module to the microcontroller IO pins, setting the corresponding pins as input/output pins, and then pulling the level high or low to put it into use.
					void setup() {
  Serial.begin(115200); // Initialize serial communication at 115200 baud rate
  pinMode(8, INPUT);   // Set D8 as input pin (for PIR motion sensor SR-501)
  pinMode(4, OUTPUT);  // Set D4 as output pin (for voice recording/playback module ISD1820)
  digitalWrite(4, LOW); // Set D4 to LOW initially
}

void loop() {
  if (digitalRead(8) == HIGH) {
    Serial.println("Intrusion detected! Activating alarm!"); // Motion detected (someone entered)
    digitalWrite(4, HIGH); // Trigger playback of the recorded alarm voice
  }
  else {
    Serial.println("No motion detected - All clear"); // No motion detected
    digitalWrite(4, LOW); // Keep D4 in LOW state
  }
  delay(1000); // Delay for 1 second before next detection cycle
}
FAQ
What is ISD1820?
ISD1820 is essentially a chip designed specifically for short-duration voice recording and playback. It simply records sound, stores it, and plays it back when needed. You don’t need to hook it up to complicated external circuits—it comes with a built-in voice processing module and amplification function, plus dedicated ports for microphones and speakers right out of the box. The most convenient thing is that recorded content won’t be lost even after power is cut off, so no extra backup is necessary. Typically, it can record 8 to 20 seconds of audio, with 10 seconds being the common default. It’s affordable and energy-efficient, making it perfect for small DIY projects, adding voice features to toys, or creating simple alarm prompts. Getting started with it is a breeze, even for beginners.
What is the voltage of ISD1820 and how to power it?
ISD1820 has a DC voltage range of 2.4V to 5.5V, but in practice, 3V to 5V works best. Within this range, it delivers optimal recording and playback quality—no low volume or distortion from insufficient voltage, and no risk of burning out the chip from excessive voltage.
The power supply method is very flexible, depending on your use case. If you’re using it with an Arduino or microcontroller development board, just connect the chip’s VCC pin to the board’s 5V or 3.3V interface, and the GND pin to the board’s ground. No separate power source is needed, and wiring is straightforward. For standalone operation, you can use three series-connected batteries or a 5V power adapter. As long as the power supply is stable and you don’t reverse the positive and negative poles, it’ll work fine. Just make sure the voltage doesn’t fluctuate too much—otherwise, you might get static noise during recording or playback, or even encounter malfunctions.
How to connect ISD1820?
Wiring ISD1820 isn’t complicated at all—just three types of connections: power, control, and speaker. First, familiarize yourself with the functions of a few key pins: VCC for the positive power supply, GND for ground, REC as the recording trigger pin, PLAYE (a quick press triggers a single playback), PLAYL (hold it down to play audio, release to stop), and SP+ / SP- for connecting the speaker.
Start by connecting the power supply: VCC to 3V-5V and GND to ground. This is the foundation—wrong wiring will prevent the module from working. For manual operation, you can use the built-in buttons on the module, so no extra wiring is needed. If you want to pair it with a microcontroller (like Arduino), connect control pins such as REC and PLAYE to the microcontroller digital pins. Later, you can trigger recording or playback by controlling the high/low voltage levels of these pins through code. Finally, connect the speaker: choose an 8Ω, 0.5W small speaker and attach its two pins to SP+ and SP- respectively. There’s no need for an additional power amplifier—the chip’s built-in amplification is enough to drive speakers of this specification.
Is there a device you can leave somewhere to record audio?
Yes, there are many devices on the market specifically designed for long-duration or unattended audio recording. While ISD1820 can record audio, it only supports short clips of around ten seconds, making it suitable for quick playback but not for extended recording sessions. So you’ll need a dedicated device for that.
The most common option is a digital voice recorder. These have large storage capacities (usually 16GB to 128GB), allowing them to record hours or even dozens of hours of audio. They also have long battery life, and some support voice activation—only starting to record when sound is detected, which saves power and storage space. Recordings are timestamped for easy searching, making them ideal for meetings, interviews, or long-term monitoring. If you need to access recordings remotely, there are WiFi or GSM wireless microphones that can stream audio to your phone or the cloud in real time, with remote start/stop control. These are great for home security or store monitoring. Additionally, security cameras with audio recording capabilities work well—they capture video and audio simultaneously, eliminating the need for a separate recording device, and are suitable for indoor and outdoor security. For covert recording, there are small devices disguised as USB drives, pens, or power outlets, with battery life lasting up to dozens of days, perfect for discreet monitoring scenarios.
