Definition of light sensor
A light sensor is an electronic device that can detect the brightness of the surrounding environment and output signals. Its main function is to convert optical signals into electrical signals, which are then recognized and processed by a controller for controlling other electronic components. It can be used in various scenarios requiring light detection.
What does a light sensor do?
Light sensors are widely used in various fields, such as consumer electronics, smart homes and the Internet of Things (IoT), industry and agriculture, scientific research, and art projects. For instance, when using a mobile phone, the automatic brightness adjustment function regulates the screen brightness based on the values detected by the light sensor; it also enables the phone to turn off the screen automatically in dark environments to prevent accidental touches. In smart homes, light sensors can adjust the opening and closing of curtains according to the room brightness and preset modes. Additionally, a light bulb with motion sensor—a common smart home device that combines light-sensing and motion-detection functions—also relies on light sensors: it can automatically turn on at low ambient brightness when motion is detected and stay off in sufficient light, achieving energy-saving and intelligent lighting control. Overall, light sensors have a relatively wide range of application fields and scopes.
Light sensor types
Classified by working principle, light sensors can be divided into four types: ① Light-Dependent Resistor (LDR), ② Photodiode, ③ Phototransistor, and ④ Integrated Ambient Light Sensor.
Light sensor circuit diagram
The four types of light sensors operate on distinct working principles, and their detailed operational mechanisms are as follows:
① Light-Dependent Resistor (LDR): It works based on the internal photoelectric effect. When the photosensitive material is exposed to light, the electrons inside it are excited, resulting in a decrease in resistance. Light intensity data can be derived from the resistance value—the stronger the light, the lower the resistance.
② Photodiode: It relies on the external photoelectric effect. When its PN junction is illuminated, it generates a current proportional to the light intensity. The light intensity data can be obtained by measuring the magnitude of this current.
③ Phototransistor: It functions like a transistor where light replaces the base current. Light exposure is equivalent to providing current to the base, which in turn controls the conduction and amplification of the current between the collector and the emitter.
④ Integrated Ambient Light Sensor: It is usually based on a photodiode or phototransistor, but integrates the sensor, amplifier, Analog-to-Digital Converter (ADC), and digital interface all into a single chip.
Light Sensor Schematic Diagram
① Light-Dependent Resistor (LDR) Schematic Diagram:
② Photodiode Schematic Diagram:
③ Phototransistor Schematic Diagram:
④ Integrated Ambient Light Sensor Schematic Diagram:
Light Sensor Functions
The core function of a light sensor is to act as a “bridge” between ambient light and electronic systems: it continuously monitors changes in light intensity, accurately capturing fluctuations in luminous flux or illuminance, ranging from faint starlight to intense sunlight. Its internal photoelectric conversion components (such as light-dependent resistors, photodiodes, etc.) convert optical signals into corresponding electrical signals—these signals can be either analog (e.g., the voltage rises from 0.5V to 3.3V as light intensity increases) or digital (outputting binary data corresponding to 0 to 10,000 lux via protocols like I²C).
These electrical signals provide controllers (such as microcontrollers, PLCs) with parsable “environmental language,” allowing the controller to drive other electronic components accordingly: for example, turning on an LED light when the light intensity is below 50 lux, and turning it off when it exceeds 500 lux to save energy; adjusting sunshade nets or supplementary lights in agricultural greenhouses; switching headlight modes in automobiles, etc. It is a key component connecting the light environment and electronic control, endowing devices with the ability to “perceive and respond.”
Several Commonly Used Small Light Sensors
What is the BH1750 (GY-302) sensor?
The BH1750 is a digital output light sensor that adopts the I²C communication protocol, enabling direct interaction with devices such as microcontrollers. Based on the photodiode principle, it has a spectral response range (400-700nm) close to that of the human eye, and can accurately detect light intensity ranging from 0 to 65,535 lux with a measurement accuracy of ±20%.
It features high resolution (minimum 1 lux) and supports two measurement modes: continuous measurement and single measurement. Additionally, it allows switching of measurement precision (1 lux or 0.5 lux) via commands. With a working voltage range of 2.4-3.6V, extremely low power consumption (approximately 120μA during measurement and only 1μA in standby mode), and a compact package (SOP-8), it is easy to integrate into various systems.
As a digital output sensor, it eliminates the need for AD conversion and offers strong anti-interference performance. Therefore, the BH1750 is widely used in scenarios requiring a certain level of precision, such as screen brightness adjustment for smartphones and smartwatches, smart home lighting control, and light intensity monitoring in agricultural greenhouses.
The BH1750FV builds on this foundation with slightly enhanced precision (±20%) and a more compact structure.
TEMT6000 Light sensor
The TEMT6000 is a commonly used analog output light sensor that operates based on the photodiode principle. It can detect visible light in the 450-650nm wavelength range (matching the visual characteristics of the human eye). When the light intensity changes, its output current responds linearly (approximately 1μA per lux). This current can be converted into a 0-3V voltage signal via an external resistor, allowing direct reading by controllers such as microcontrollers.
With a compact package (available in SMD or through-hole types), low operating voltage (2-5V), and minimal power consumption, it is suitable for portable devices. Typical applications include smart lighting systems (for automatic brightness adjustment), mobile phone screen backlight control, and greenhouse light intensity monitoring. Although its accuracy is lower than that of high-end digital sensors, it is widely used in consumer electronics and lightweight industrial scenarios due to its advantages of low cost and easy integration.
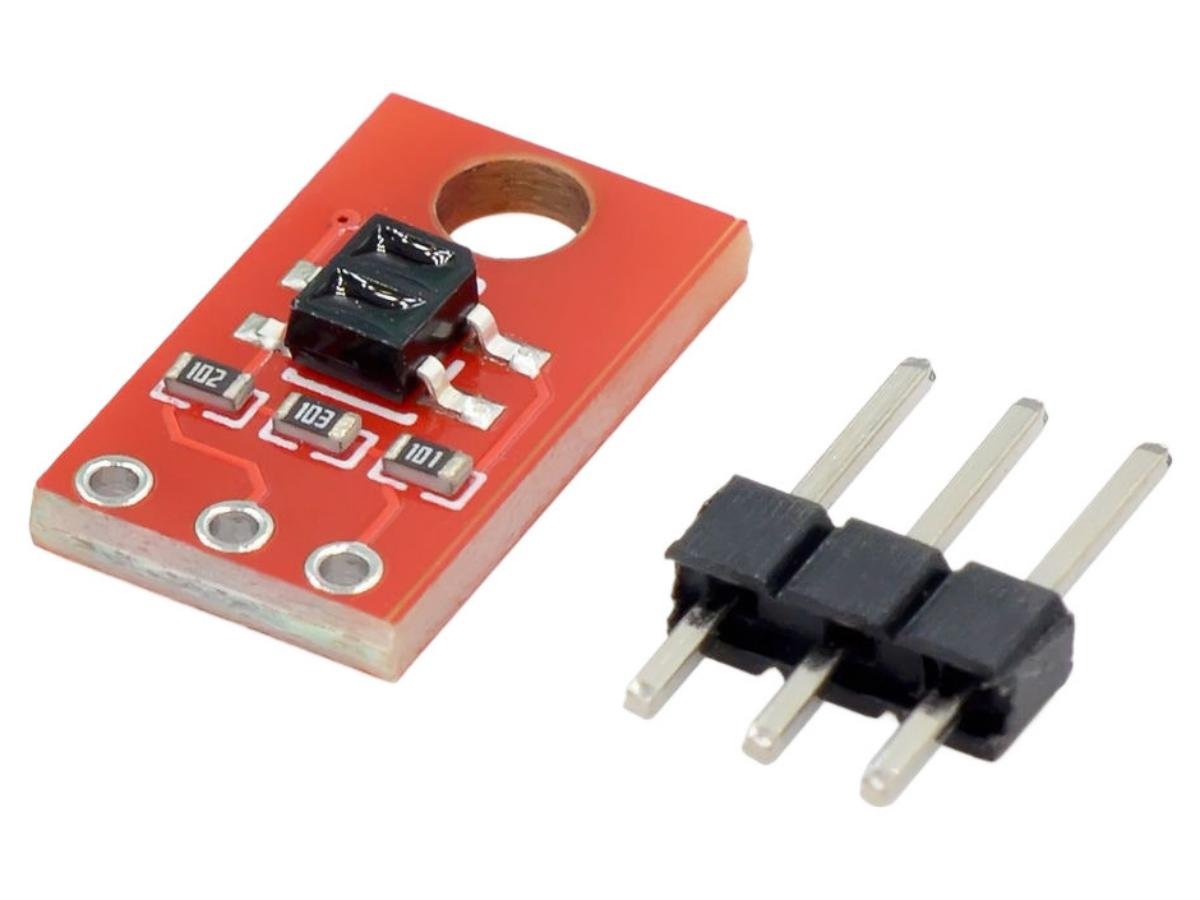
OPT101 Light Sensor
The
OPT101 is a monolithic light intensity sensor that integrates a photodiode and a transimpedance amplifier into a single chip. It operates based on the photovoltaic effect of the photodiode, enabling efficient conversion of optical signals into electrical signals, which are then processed by an internal operational amplifier circuit. With a wide spectral response range covering 300nm to 1000nm, it can effectively detect ultraviolet light, visible light, and near-infrared light.
The sensor’s output voltage has a linear relationship with light intensity, boasting an accuracy of ±2%. It can also work stably in low-light environments and output low-noise signals. It supports flexible power supply modes: a single power supply ranging from 2.7V to 36V, or a dual power supply ranging from ±2.5V to ±18V. Additionally, it features extremely low power consumption with a quiescent current of only 120μA. Thanks to its excellent performance, the OPT101 is widely used in pulse signal acquisition for medical devices and scenarios requiring precise light intensity measurement, such as smart lighting systems and display flicker detection.
Electrical Parameters
BH1750 (GY-302) Electrical Parameters
| Parameter |
Value |
| Supply Voltage |
DC 3~5V |
| Supply Current |
200µA |
| Operating Temperature |
-40~+85°C |
| Resolution |
0~65535 lx |
| Interface |
I2C |
| Error Variation |
±20% |
TEMT6000 Electrical Parameters
| Parameter |
Value |
| Operating Voltage |
3.3~5.5V |
| Operating Temperature |
-40~85°C |
| Illuminance Range |
1 ~ 1000Lux |
| Output Signal |
Analog voltage, 0 ~ 5V range at 5V operating voltage |
OPT101 Electrical Parameters
| Parameter |
Value |
| Supply Voltage |
2.7V to 5.5V |
| Operating Temperature Range |
-40°C to +85°C |
| Photodiode Area |
Approx. 1mm² |
| Transimpedance Gain |
10⁵ Ω (Typical) |
| Output Current Range |
0µA to 2mA |
| Bandwidth |
30kHz (Typical) |
Light Sensor Datasheet
Light Sensor Pinout
BH1750(GY-302) Pinout
①VCC:2.4V-3.6V ②GND:Ground ③SCL:Serial Clock ④SDA:Serial Data ⑤ADDR: I²C Address Select
TEMT6000 Pinout
①OUT:AOUT(ADC) ②VCC:3.3V-5.5V ③GND:Ground
OPT101 Pinout
①VCC: +2.7V – 36V ②GND: Ground ③1M: 1MΩ Resistor ④OUT: ADC ⑤-V: Ground or Vcc- ⑥COM:Ground
How to check if a light sensor is working?
For this demonstration, we will use an Arduino Uno and a BH1750. Alternatively, any microcontroller and light sensor capable of data interaction can be used.
Open the Arduino IDE on your computer, connect the Arduino Uno to your PC, and select the correct serial port, as shown in the figure.
Next, connect the SCL and SDA pins of the BH1750 to the corresponding interfaces on the Arduino Uno. Enter the following code on your computer, download the BH1750 library, and upload the code.
Once the upload is complete, open the Serial Monitor, and you will see the current data. This data will change with the light intensity. If the data changes normally, the device is ready for use.
A simple application example of a light sensor
FAQ
Can you put a sensor on an existing light?
Certainly, it’s not difficult to install a light sensor on an existing lamp. You need to determine the voltage used by your lamp, step down the voltage to power the light sensor, and then the light sensor can be directly connected to a MOSFET to control the on/off of the lamp. This setup will allow you to achieve the desired functionality.
What triggers a sensor light?
The ways to trigger a light sensor vary depending on its characteristics. However, in general, any method that affects light brightness will trigger the light sensor. For example, actions such as blocking or illuminating the sensor will trigger it and change its output value.
What is the max value of BH1750?
According to the datasheet, the maximum value of the BH1750 light sensor is 65,535 lux.
What is the sensitivity of the TEMT6000?
The sensitivity of the TEMT6000 is not fixed; instead, it refers to the slope of its characteristic curve. Under a standard illuminance of 100 lux, the typical collector current is 10μA.